|
Please
read these instructions carefully before proceeding.
|
Fitting
|
1.
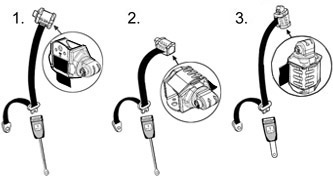
Locate anchorage points in car. Diagrams 1-3 show typical
locations/applications.
2.
Install belt as shown referring to appropriate anchorage(Diagrams
4, 5 & 6).
3.
Adjust automatic retractor to suit installation position
as indicated on retractor (Diagrams 7, 8 & 9).
|
Typical
Locations

|
|
|
| The
automatic retractor can be adjusted to operate at
any angle by rotating cap ‘A’, (by hand)
and button ‘B’, (using 50p coin) to achieve
correct angle setting (see Diagram 7).
The
adjustment is required to set the pendulum within
the retractor in an upright position. Rotate cap
‘A’ and button ‘B’ in directions
indicated. This will leave the large cap ‘A’
straight arrow either pointing upwards or horizontal.
Either is acceptable providing the small arrow ‘B’
is pointing upwards (Vertical).
|
|
|
|
|
FRONT
VIEW OF REEL
Typical
mounting angles with appropriate arrow settings. B is
always pointing upwards, A is pointing upwards or horizontal.
|
|
SIDE
VIEW OF REEL
Typical
mounting angles with appropriate arrow settings. A and
B are always pointing upwards.
|
For
MG Cars
MGB GT: Mount retractor on to top of wheel arch with bolt,
shakeproof washer and spacer provided. If necessary use
¾” bolt, lockwasher, ‘S’ bracket ,
and nut to space retractor from / above anchorage point.
MG
Midget and MGB Roadster: Use bolt and shakeproof washer
to fix to anchorage point located on side of wheel arch.
Late
model MGB Roadster:
Bolt ‘S’ bracket to underside of anchorage point
immediately forward of the boot using bolt, spacer and
lockwasher provided. These require to be bolted pointing
towards centre line of car. Attach retractors using ¾”
bolt, lockwasher and nut to the ‘S’ bracket.
In some cases the additional flat extension bracket may
be required.
Automatic seat belts installed in Roadster type vehicles
may impede the easy stowage of the hood.
|
|
|
USERS
AND MAINTENANCE INSTRUCTIONS
|
| FASTENING
THE BELT: Insert belt tongue into buckle, a positive locking
'click' indicates assembly.
RELEASING THE BELT:
Press the release button on the buckle and the tongue will be
ejected.
IMPORTANT
* These instructions should be passed to the owner/driver.
* The belt is designed for use by one person and must not be put
around a child seated on a persons lap.
* It is important to wear the belt on each journey.
* The belt is suitable for restraining most child seats and boosters.
* It is not intended for children unless used with other approved
restraints.
* The belt should at all times be adjusted and used in accordance
with the instructions. No excessive slackness should be present.
* Once installed the diagonal should pass across the centre of
the shoulder and the buckle should lie just on or below the hip.
* Avoid twisting the webbing during use. Webbing must not be allowed
to chafe, i.e. against sharp edges.
* Do not make alterations or additions to the belt. If in doubt,
consult the manufacturer.
* Periodic inspection of the belt and installation is recommended.
* Belts need to be in good condition. If they have been cut, frayed,
damaged or stressed through impact they should be replaced. After
impact, the car anchorage points should also be checked.
* To clean use warm soapy water only. Do not use chemical cleaners,
Bleach or Dye. Contamination with petrol, Grease and Acid will
be detrimental.
TESTING THE INSTALLATION
When fitting is complete, with the car stationary, tug sharply
on the webbing and observe that the belt locks.
|
|