|
Please
read these instructions carefully before proceeding.
|
IMPORTANT
|
Please
read these instructions completely before fitting or using.
No alterations should be made to the installation or the
assemblies. If in doubt consult the manufacturer.
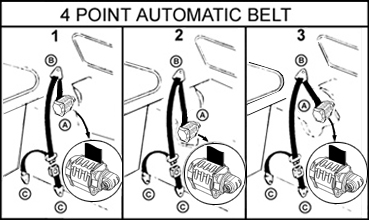
1. Locate anchorage points in car to diagram 1 to 6. These
show typical applications.
2. Install belt as shown referring to appropriate anchorage
diagrams. (A, B & C).
3. Adjust retractor locking mechanism to suit installation
position as described below. (See diagrams 8 + 9).
4. Fit protective cover on retractor by locating on tie
bars and snapping into place.
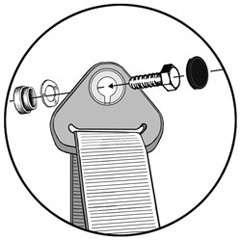
THE 50mm x 36mm PLATE MUST BE FITTED UNDER THE HEAD OF
THE RETRACTOR FIXING BOLT.
In
some instances it may be necessary to mount the retractor
on a bracket as shown in diagram 10 in order that the
retractor can be offset to avoid bodywork etc.
If it is difficult to extract the webbing before installation
follow these steps:-
(i) Ensure that the reel is perfectly upright (with
webbing coming out at the top) as shown in diagram 7,
arrows upright. This can be done in the vehicle or another
convenient position i.e. against the wall.
(Ii) With your thumb and fingers slowly, but firmly,
wind an extra inch of the webbing on to the reel.
(Iii) Slowly, but firmly, pull the webbing out of the
reel. This must be done smoothly to avoid locking the
mechanism.
During this operation the reel must remain upright.
|
|

|
|
|
|
|
Upper
Bracket Mounting

|
|
The
retractor can be mounted in any position but MUST be adjusted
to operate correctly.
The adjustment is required to set the pendulum within the
retractor in an upright position. Rotate cap "A"
by hand and button "B" (using 50p coin) in direction
indicated until straight arrow on button is in an upright
position. This will leave the large cap "A" straight
arrow either pointing upwards or horizontal; either is acceptable
providing the small arrow "B" is always upright.
See diagrams 8 & 9 for some typical installation settings.
Where retractor is mounted under a parcel shelf or support,
cut a slot in the trim approximately 2" by ¾",
cut plastic channel to length and fix around the cut edge
of trim.
A.
TYPICAL CAR INSTALLATION
Upright Mounting Position.
Front view of reel - typical mounting angles with appropriate
arrow settings. "B" is always upright, "A"
pointing upwards or horizontal in these positions.
*N.B. The retractor is adjusted at the factory for the
upright mounting position.
B.
TYPICAL CAR INSTALLATION
Horizontal Mounting Reel (e.g. Parcel Shelf).
Side view of reel - typical mounting angles with appropriate
arrow settings. "B" is always upright, and "A"
pointing upwards in these positions.
*N.B. The retractor is adjusted at the factory for the
upright mounting position.
|
|
|
USERS
AND MAINTENANCE INSTRUCTIONS
|
| FASTENING
THE BELT: Insert belt tongue into buckle, a positive locking
'click' indicates assembly.
RELEASING THE BELT:
Press the release button on the buckle and the tongue will be
ejected.
IMPORTANT
* These instructions should be passed to the owner/driver.
* The belt is designed for use by one person and must not be put
around a child seated on a persons lap.
* It is important to wear the belt on each journey.
* The belt is suitable for restraining most child seats and boosters.
* It is not intended for children unless used with other approved
restraints.
* The belt should at all times be adjusted and used in accordance
with the instructions. No excessive slackness should be present.
* Once installed the diagonal should pass across the centre of
the shoulder and the buckle should lie just on or below the hip.
* Avoid twisting the webbing during use. Webbing must not be allowed
to chafe, i.e. against sharp edges.
* Do not make alterations or additions to the belt. If in doubt,consult
the manufacturer.
* Periodic inspection of the belt and installation is recommended.
* Belts need to be in good condition. If they have been cut, frayed,
damaged or stressed through impact they should be replaced. After
impact, the car anchorage points should also be checked.
* To clean use warm soapy water only. Do not use chemical cleaners,
Bleach or Dye. Contamination with petrol, Grease and Acid will
be detrimental.
TESTING THE INSTALLATION
(1) With the seat belt worn and secured brake sharply at 5mph
(25kph), lean into the harness and observe that the belt is locked.
(2) With the car stationary rapidly pull the webbing from the
reel and observe that the belt is locked.
|
|